UPDATE:
This tutorial has become too large to post on the forums. I have instead created a 58 page PDF file comprising the entire tutorial. The tutorial includes screenshots and sample files that can be used for testing. All of the files, including the PDF file are archived in a .tar.gz file. It can be downloaded from this link:
http://www.mediafire.com/file/2yimyo...ization.tar.gz
This is my first tutorial, so any comments is appreciated. I will leave Part 1 posted but any questions and or comments on any part of the tutorial can be posted in this thread.
DISCLAIMER:
The procedures outlined below have been tested ONLY on Karmic. There is no guarantee that they will work on other versions of Ubuntu. If you decide to test on other versions, YOU DO SO AT YOUR OWN RISK. A lot of the customization is carried out at the command line and involves directly modifying system files. Of course, we all know the dangers associated with such actions, so if your system gets screwed, refuses to boot, catches afire, runs away or goes to sleep and never wakes up again, DO NOT BLAME ME. You have been FORE-WARNED.
With all the prelimanaries out of the way, put on the coffee, send the kids to bed, put out the dog, kiss the wifey good-nite and let's get cracking.
INTRODUCTION
In my quest to fully customize the graphics in Ubuntu 9.10 (Karmic Koala) starting fom the Grub menu and working my way up to the desktop I've found bits and pieces of informations scattered throughout the threads. Most of these were not geared towards people new to Karmic. Also, a lot of the customization were not thorough enough, I wanted to do a lot more than what was given. This is when I decided to test the waters of customizing Karmic. The learning curve was very steep because I am also a beginner to Karmic and Linux on the whole. I decided to put everything I've learnt into what I hope will be a very comprehensive guide on customizing the graphics screens of Karmic starting from the Grub menu.
This guide is written for beginners and so the more experienced users may fnd it a bit repetitive. Some may even say that there are programs available that allows you to do the customizations easily, but I've found that such programs just scratches the surface of what's possible.
Open a Terminal window by clicking on Applications => Accessories => Terminal. Most of the commands that's used start with the sudo command. Sudo allows us to run a command with root privileges. For more information on sudo, open the Ubuntu Help Center and type 'man sudo' in the search box or have a look at the following links:
http://ubuntuforums.org/showthread.php?t=261204
http://ubuntuforums.org/showthread.php?t=723263
http://ubuntuforums.org/showthread.php?t=292094
http://en.wikipedia.org/wiki/Sudo
Throughout this document, whenever I back-up fles, I append '_orig' to the original names. This applies to both files and directories. You may rename them whatever you like but, please try to be consistent.
Gedit is used as the text editor throughout this document but, if you are more comfortable using another editor then please do.
The different graphic screens during the boot-up sequence occur in this order:
grub => usplash => xsplash => gdm (login screen) => xsplash => desktop
I will go through the procedures for customizing each of these, starting with Grub.
BTW, the graphics are meant to educate not entertain, so please. 
Finally, this tutorial has become too long to put into one post, so it's split up into four parts:
Part 1: Customizing the graphics in Grub (shown in this post)
Part 2: Customizing Xsplash
Part 3: Customizing the graphics in GDM
Part 4: Customizing Usplash
PART 1: Customizing the graphics in GRUB
The procedure listed below changes the Grub menu colors and adds a background image (Grub wallpaper). It was tested on Grub 1.97~beta4 ONLY.
First, back-up the files that will be modified. The three files that will be modified are:
- /etc/grub.d/05_debian_theme
- /etc/grub.d/00_header, and
- /etc/default/grub
Enter the following commands in the Terminal window:
Code:
sudo cp /etc/grub.d/05_debian_theme /etc/grub.d/05_debian_theme_orig
sudo cp /etc/grub.d/00_header /etc/grub.d/00_header_orig
sudo cp /etc/default/grub /etc/default/grub_orig
To restore the original files, enter the following commands:
Code:
sudo cp /etc/grub.d/05_debian_theme_orig /etc/grub.d/05_debian_theme
sudo cp /etc/grub.d/00_header_orig /etc/grub.d/00_header
sudo cp /etc/default/grub_orig /etc/default/grub
Menu Colors:
The text colors for Grub's menu are specified in the 05_debian_theme file. Open this file for editing with gedit:
Code:
gksudo gedit /etc/grub.d/05_debian_theme
Locate the following two lines at the beginning of the file:
Code:
set menu_color_normal=white/black
set menu_color_highlight=black/white
The color format is: foregroundcolor/backgroundcolor. For a list of possible colors that can be used, have a look at:
http://www.gnu.org/software/grub/man...lor.html#color
Set the menu colors to green text on a black background and reverse it for the selected item in the menu:
Code:
set menu_color_normal=green/black
set menu_color_highlight=black/green
Save the changes and exit gedit. Grub must be updated for the changes to take effect.
Enter this command in the Terminal window:
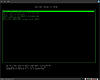
This updates the /boot/grub.cfg file. Reboot to see the new menu colors. Here's a screenshot of what it looks like.
Notice the Grub title and help text are still white. To change these colors, do the following:
Open /etc/grub.d/05_debian_theme for editing:
Code:
gksudo gedit /etc/grub.d/05_debian_theme
Add the following line (shown in red) beneath the set menu_color_highlight line:
Code:
set menu_color_normal=green/black
set menu_color_highlight=black/green
set color_normal=green/black
The beginning of the /etc/grub.d/05_debian_theme file should now look something like this:
Code:
set_mono_theme()
{
  cat << EOF
set menu_color_normal=green/black
set menu_color_highlight=black/green
set color_normal=green/black
EOF
}
Save the changes and exit gedit. Update Grub to reflect the changes.
Reboot to see the changes.
Now that we can change the menu colors, let's add a backgound image.
Background:
Grub's default screen dimension is 640x480. Grub does not scale the background image to fit the screen's dimension so the image used should have the same size as the screen's dimension. At this point in the tutorial, copy the image file to /usr/share/images/desktop-base/moreblue-orbit-grub.png. Grub wll accept either a png or tga format image file.
Assuming your image file is in your Documents directory and named mygrubimage.png, enter (in the Terminal window):
Code:
sudo cp ~/Documents/mygrubimage.png /usr/share/images/desktop-base/moreblue-orbit-grub.png
Grub can also use a different menu color when a background image is displayed. Open /etc/grub.d/05_debian_theme for editing and locate the following lines:
Code:
if background_image `make_system_path_relative_to_its_root ${bg}` ; then
  set color_normal=black/black
  set color_highlight=magenta/black
else
Change the colors:
Code:
if background_image `make_system_path_relative_to_its_root ${bg}` ; then
  set color_normal=green/black
  set color_highlight=black/blue
else
Save the changes, exit gedit and update Grub to reflect the changes:
Can I use images from another directory? Yes, you can. This is how it's done:
Open /etc/grub.d/05_debian_theme for editing and locate the line:
Code:
for i in {/boot/grub,/usr/share/images/desktop-base}/moreblue-orbit-grub.{png,tga} ; do
Add the directory with the image to this line like this (assuming that the name of the directory is /home/towheed/Documents/images):
Code:
for i in {/boot/grub,/usr/share/images/desktop-base,/home/towheed/Documents/images}/moreblue-orbit-grub.{png,tga} ; do
Next, assuming the name of the image is shaded.png, replace moreblue-orbit-grub with shaded. The line should now look similar to this:
Code:
for i in {/boot/grub,/usr/share/images/desktop-base,/home/towheed/Documents/images}/shaded.{png,tga} ; do
Remember, the dimensions of the image file must be 640x480.
Update Grub to reflect the changes.
Reboot to see your new background.
Grub can use images of different dimensions for its background. Before this is done though, the video mode that Grub uses must be changed. Grub may not necessarily support all of the video modes of a particular graphics card. To determine which modes Grub support, follow this simple procedure:
- Reboot
- When the Grub menu shows, press 'c' to go the Grub command line. Your prompt should be 'sh.grub>'.
- At the prompt type 'vbeinfo'. A list of video modes will be displayed.
- Take note of the mode you would like to use, i.e.: 1024x768, 1280x1024 etc.
- Press <ESC> to return to the menu.
- Boot your menu choice and continue from below.
Open /etc/default/grub for editing:
Code:
gksudo gedit /etc/default/grub
Locate this line:
Code:
#GRUB_GFXMODE=640x480
The hash (#) symbol indicates this line is a comment. Uncomment the line by deleting the hash and replace the 640x480 with the mode that you noted in Step 4 above. If 1024x768 was chosen the line should look like this:
Code:
GRUB_GFXMODE=1024x768
Grub will now use this video mode and an image this size can now be used for the background.
When finish editing, save the file, close gedit and update Grub. Reboot to see the menu and background image in the new video mode.
If after rebooting, the menu is still shown at 640x480, the file /etc/grub.d/00_header must be edited.
Open the file for editing:
Code:
gksudo gedit /etc/grub.d/00_header
Locate the following line:
Code:
set gfxmode=640x480
Change it to:
Code:
set gfxmode=${GRUB_GFXMODE}
Save the file, close gedit, update Grub and reboot.
NOTE: Whenever we modify these files (or any of Grub's configuration files) we must update Grub for the changes to take effect.
For those interested in customizng other aspects of Grub take a look here:
http://ubuntuforums.org/showthread.p...u+entries+grub


 Adv Reply

Bookmarks