Backup Partitions Using LVM Snapshots and FSArchiver
This method will allow online backup of the server at the partition level. It is designed to run via crontab schedule but can also be run manually.
This should be considered a full backup which means you will probably need to rely on other methods for granular backups and restores such as using rsync at the file level.
This method is great for backing up a system just prior to and just after a major upgrade of the OS or application. It is not very helpful for retrieving individual files although it could be done but would require a bit of work by temporarily restoring to an unused area, retrieving the file(s) and then destroying the temporary partition.
The /bak partition is skipped because that is where the archives are being stored.
The /tmp partition is skipped because there should not be anything in there that needs to be restored...but feel free to include it if you like.
The script below was built around a few very basic commands that do the bulk of the work but most of the code is for error handling.
Here are examples of the commands:
Code:
## Create the snapshot volume of the partition to be backed up.
lvcreate --size=5G --snapshot --name="tempsnap" /dev/LVG/root

## Create the compressed and encrypted archive of the snapshot.
fsarchiver savefs --compress=7 --jobs=1 --cryptpass="abc123" --label="insert comment here" /bak/root.fsa /dev/LVG/tempsnap

## Create an informational text file about the archive.
fsarchiver archinfo --cryptpass="abc123" /bak/root.fsa > /bak/root.txt 2>&1

## Remove the snapshot.
lvremove --force /dev/LVG/tempsnap

## Create a checksum file about the archive.
md5sum /bak/root.fsa > /bak/root.md5

## Verify that the checksum file can validate against the archive.
md5sum --check /bak/root.md5
Here is an example of a crontab entry to run the script once a day.
/var/scripts/data/crontab.root
Code:
0 4 * * * /var/scripts/prod/back-parts.sh > /dev/null 2>&1
Here is the script.
/var/scripts/prod/back-parts.sh
Code:
#!/bin/bash
#############################################################
## Name : back-parts.sh (Backup Partitions)
## Version : 1.0
## Date : 2013-01-09
## Author : LHammonds
## Purpose : Backup partitions
## Compatibility : Verified on Ubuntu Server 12.04-14.04 LTS (fsarchiver 0.6.12-0.6.19)
## Requirements : Fsarchiver, Sendemail, run as root
## Run Frequency : Once per day or as often as desired.
## Parameters : None
## Exit Codes :
## 0 = Success
## 1 = ERROR: Lock file detected
## 2 = ERROR: Must be root user
## 4 = ERROR: Missing software
## 8 = ERROR: LVM problems
## 16 = ERROR: File creation problems
## 32 = ERROR: Mount/Unmount problems
###################### CHANGE LOG ###########################
## DATE VER WHO WHAT WAS CHANGED
## ---------- --- --- ---------------------------------------
## 2013-01-09 1.0 LTH Created script.
#############################################################

## Import standard variables and functions. ##
source /var/scripts/common/standard.conf

## Define local variables.
LOGFILE="${LOGDIR}/${COMPANY}-back-parts.log"
LOCKFILE="${TEMPDIR}/${COMPANY}-back-parts.lock"
LVG="/dev/LVG"
TempLV="${LVG}/tempsnap"
MaxTempVolSize=1G
ErrorFlag=0
ReturnCode=0
CryptPass="abc123"

#######################################
##            FUNCTIONS              ##
#######################################

function f_cleanup()
{
  if [ -f ${LOCKFILE} ];then
    ## Remove lock file so other check space jobs can run.
    rm ${LOCKFILE} 1>/dev/null 2>&1
  fi
  if [ ${ErrorFlag} != 0 ]; then
    f_sendmail "ERROR: Script Failure" "Please review the log file on ${HOSTNAME}${LOGFILE}"
    echo "`date +%Y-%m-%d_%H:%M:%S` - Backup aborted." >> ${LOGFILE}
  fi
  exit ${ErrorFlag}
}

function f_archive_fs()
{
  FSName=$1
  FSPath=$2

  ## Purge old backup files.
  if [ -f ${BACKUPDIR}/${HOSTNAME}-${FSName}.fsa ]; then
    rm ${BACKUPDIR}/${HOSTNAME}-${FSName}.fsa
  fi
  if [ -f ${BACKUPDIR}/${HOSTNAME}-${FSName}.txt ]; then
    rm ${BACKUPDIR}/${HOSTNAME}-${FSName}.txt
  fi
  if [ -f ${BACKUPDIR}/${HOSTNAME}-${FSName}.md5 ]; then
    rm ${BACKUPDIR}/${HOSTNAME}-${FSName}.md5
  fi

  ## Unmount FileSystem.
  umount /${FSName}

  LVLabel="${HOSTNAME}:${FSPath}->/${FSName}"
  ## Create the compressed and encrypted archive of the snapshot.
  fsarchiver savefs --compress=7 --jobs=1 --cryptpass="${CryptPass}" --label="${LVLabel}" ${BACKUPDIR}/${HOSTNAME}-${FSName}.fsa ${FSPath} > /dev/null 2>&1
  ReturnCode=$?
  if [ ${ReturnCode} != 0 ]; then
    ## Creation of the archive failed.
    echo "`date +%Y-%m-%d_%H:%M:%S` --- ERROR: Creation of ${BACKUPDIR}/${FSName}.fsa failed, Return Code = ${ReturnCode}" >> ${LOGFILE}
    ErrorFlag=16
    f_cleanup
  fi

  ## Create an informational text file about the archive.
  fsarchiver archinfo --cryptpass="${CryptPass}" ${BACKUPDIR}/${HOSTNAME}-${FSName}.fsa > ${BACKUPDIR}/${HOSTNAME}-${FSName}.txt 2>&1
  ReturnCode=$?
  if [ ${ReturnCode} != 0 ]; then
    ## Creation of info text failed.
    echo "`date +%Y-%m-%d_%H:%M:%S` --- ERROR: Creation of info file failed for ${BACKUPDIR}/${FSName}.txt, Return Code = ${ReturnCode}" >> ${LOGFILE}
    ErrorFlag=16
    f_cleanup
  fi

  ## Create a checksum file about the archive.
  md5sum ${BACKUPDIR}/${HOSTNAME}-${FSName}.fsa > ${BACKUPDIR}/${HOSTNAME}-${FSName}.md5
  ReturnCode=$?
  if [ ${ReturnCode} != 0 ]; then
    ## Creation of md5 checksum failed.
    echo "`date +%Y-%m-%d_%H:%M:%S` --- ERROR: Creation of checksum failed for ${BACKUPDIR}/${FSName}.md5, Return Code = ${ReturnCode}" >> ${LOGFILE}
    ErrorFlag=16
    f_cleanup
  fi

  ## Verify that the checksum file can validate against the archive.
  md5sum --check --status ${BACKUPDIR}/${HOSTNAME}-${FSName}.md5
  ReturnCode=$?
  if [ ${ReturnCode} != 0 ]; then
    ## Verification failed.
    echo "`date +%Y-%m-%d_%H:%M:%S` --- ERROR: md5 validation check failed for ${BACKUPDIR}/${FSName}.md5. Return Code = ${ReturnCode}" >> ${LOGFILE}
    ErrorFlag=16
    f_cleanup
  fi

  BackupSize=`ls -lak --block-size=m "${BACKUPDIR}/${HOSTNAME}-${FSName}.fsa" | awk '{ print $5 }'`

  echo "`date +%Y-%m-%d_%H:%M:%S` --- Created: ${BACKUPDIR}/${HOSTNAME}-${FSName}.fsa, ${BackupSize}" >> ${LOGFILE}

  ## Copy the backup to an offsite storage location.
  echo "`date +%Y-%m-%d_%H:%M:%S` --- Copying archive file to offsite location." >> ${LOGFILE}
  cp ${BACKUPDIR}/${HOSTNAME}-${FSName}.* ${OFFSITEDIR}/. 1>/dev/null 2>&1
  if [ ! -f ${OFFSITEDIR}/${HOSTNAME}-${FSName}.fsa ]; then
    ## NON-FATAL ERROR: Copy command did not work.  Send email notification.
    echo "`date +%Y-%m-%d_%H:%M:%S` --- WARNING: Remote copy failed. ${OFFSITEDIR}/${HOSTNAME}-${FSName}.fsa does not exist!" >> ${LOGFILE}
    f_sendmail "Backup Failure - Remote Copy" "Remote copy failed. ${OFFSITEDIR}/${HOSTNAME}-${FSName}.fsa does not exist\n\nBackup file still remains in this location: ${HOSTNAME}:${BACKUPDIR}/${HOSTNAME}-${FSName}.fsa"
  fi

  ## Remount FileSystem.
  mount /${FSName}
}

function f_archive_vol()
{
  LVName=$1
  LVPath=${LVG}/${LVName}

  ## Purge old backup files.
  if [ -f ${BACKUPDIR}/${HOSTNAME}-${LVName}.fsa ]; then
    rm ${BACKUPDIR}/${HOSTNAME}-${LVName}.fsa
  fi
  if [ -f ${BACKUPDIR}/${HOSTNAME}-${LVName}.txt ]; then
    rm ${BACKUPDIR}/${HOSTNAME}-${LVName}.txt
  fi
  if [ -f ${BACKUPDIR}/${HOSTNAME}-${LVName}.md5 ]; then
    rm ${BACKUPDIR}/${HOSTNAME}-${LVName}.md5
  fi

  ## Create the snapshot volume of the partition to be backed up.
  lvcreate --size=${MaxTempVolSize} --snapshot --name="tempsnap" ${LVPath} > /dev/null 2>&1
  ReturnCode=$?
  if [ ${ReturnCode} != 0 ]; then
    ## Creation of temporary volume failed.
    echo "`date +%Y-%m-%d_%H:%M:%S` --- ERROR: Creation of temp volume failed for ${LVPath}, size=${MaxTempVolSize}, Return Code = ${ReturnCode}" >> ${LOGFILE}
    ErrorFlag=8
    f_cleanup
  fi

  ## Give the OS a moment to let the LV create command do its thing.
  sleep 2

  LVLabel="${HOSTNAME}:${LVPath}"
  ## Create the compressed and encrypted archive of the snapshot.
  fsarchiver savefs --compress=7 --jobs=1 --cryptpass="${CryptPass}" --label="${LVLabel}" ${BACKUPDIR}/${HOSTNAME}-${LVName}.fsa ${TempLV} > /dev/null 2>&1
  ReturnCode=$?
  if [ ${ReturnCode} != 0 ]; then
    ## Creation of the archive failed.
    echo "`date +%Y-%m-%d_%H:%M:%S` --- ERROR: Creation of ${BACKUPDIR}/${HOSTNAME}-${LVName}.fsa failed, Return Code = ${ReturnCode}" >> ${LOGFILE}
    ErrorFlag=16
    f_cleanup
  fi

  ## Create an informational text file about the archive.
  fsarchiver archinfo --cryptpass="${CryptPass}" ${BACKUPDIR}/${HOSTNAME}-${LVName}.fsa > ${BACKUPDIR}/${HOSTNAME}-${LVName}.txt 2>&1
  ReturnCode=$?
  if [ ${ReturnCode} != 0 ]; then
    ## Creation of info text failed.
    echo "`date +%Y-%m-%d_%H:%M:%S` --- ERROR: Creation of info file failed for ${BACKUPDIR}/${HOSTNAME}-${LVName}.txt, Return Code = ${ReturnCode}" >> ${LOGFILE}
    ErrorFlag=16
    f_cleanup
  fi

  ## Create a checksum file about the archive.
  md5sum ${BACKUPDIR}/${HOSTNAME}-${LVName}.fsa > ${BACKUPDIR}/${HOSTNAME}-${LVName}.md5
  ReturnCode=$?
  if [ ${ReturnCode} != 0 ]; then
    ## Creation of md5 checksum failed.
    echo "`date +%Y-%m-%d_%H:%M:%S` --- ERROR: Creation of checksum failed for ${BACKUPDIR}/${HOSTNAME}-${LVName}.md5, Return Code = ${ReturnCode}" >> ${LOGFILE}
    ErrorFlag=16
    f_cleanup
  fi

  ## Remove the snapshot.
  lvremove --force ${TempLV} > /dev/null 2>&1
  ReturnCode=$?
  if [ ${ReturnCode} != 0 ]; then
    ## Removal of temporary volume failed.
    echo "`date +%Y-%m-%d_%H:%M:%S` --- ERROR: Removal of temp volume failed. ${TempLV}. Return Code = ${ReturnCode}" >> ${LOGFILE}
    ErrorFlag=8
    f_cleanup
  fi

  ## Give the OS a moment to let the LV remove command do its thing.
  sleep 2

  ## Verify that the checksum file can validate against the archive.
  md5sum --check --status ${BACKUPDIR}/${HOSTNAME}-${LVName}.md5
  ReturnCode=$?
  if [ ${ReturnCode} != 0 ]; then
    ## Verification failed.
    echo "`date +%Y-%m-%d_%H:%M:%S` --- ERROR: md5 validation check failed for ${BACKUPDIR}/${HOSTNAME}-${LVName}.md5. Return Code = ${ReturnCode}" >> ${LOGFILE}
    ErrorFlag=16
    f_cleanup
  fi

  BackupSize=`ls -lak --block-size=m "${BACKUPDIR}/${HOSTNAME}-${LVName}.fsa" | awk '{ print $5 }'`

  echo "`date +%Y-%m-%d_%H:%M:%S` --- Created: ${BACKUPDIR}/${HOSTNAME}-${LVName}.fsa, ${BackupSize}" >> ${LOGFILE}

  ## Copy the backup to an offsite storage location.
  echo "`date +%Y-%m-%d_%H:%M:%S` --- Copying archive file to offsite location." >> ${LOGFILE}
  cp ${BACKUPDIR}/${HOSTNAME}-${LVName}.* ${OFFSITEDIR}/. 1>/dev/null 2>&1
  if [ ! -f ${OFFSITEDIR}/${HOSTNAME}-${LVName}.fsa ]; then
    ## NON-FATAL ERROR: Copy command did not work.  Send email notification.
    echo "`date +%Y-%m-%d_%H:%M:%S` --- WARNING: Remote copy failed. ${OFFSITEDIR}/${HOSTNAME}-${LVName}.fsa does not exist!" >> ${LOGFILE}
    f_sendmail "Backup Failure - Remote Copy" "Remote copy failed. ${OFFSITEDIR}/${HOSTNAME}-${LVName}.fsa does not exist\n\nBackup file still remains in this location: ${HOSTNAME}:${BACKUPDIR}/${HOSTNAME}-${LVName}.fsa"
  fi
}

#######################################
##           MAIN PROGRAM            ##
#######################################

if [ -f ${LOCKFILE} ]; then
  # Lock file detected.  Abort script.
  echo "Backup partitions script aborted"
  echo "This script tried to run but detected the lock file: ${LOCKFILE}"
  echo "Please check to make sure the file does not remain when backup partitions is not actually running."
  f_sendmail "ERROR: Backup partitions script aborted" "This script tried to run but detected the lock file: ${LOCKFILE}\n\nPlease check to make sure the file does not remain when backup partitions is not actually running.\n\nIf you find that the script is not running/hung, you can remove it by typing 'rm ${LOCKFILE}'"
  ErrorFlag=1
  exit ${ErrorFlag}
else
  echo "`date +%Y-%m-%d_%H:%M:%S` ${SCRIPTNAME}" > ${LOCKFILE}
fi

## Requirement Check: Script must run as root user.
if [ "$(id -u)" != "0" ]; then
  ## FATAL ERROR DETECTED: Document problem and terminate script.
  echo "`date +%Y-%m-%d_%H:%M:%S` ERROR: Root user required to run this script." >> ${LOGFILE}
  ErrorFlag=2
  f_cleanup
fi

## Requirement Check: Software
command -v fsarchiver > /dev/null 2>&1 && ReturnCode=0 || ReturnCode=1
if [ ${ReturnCode} = 1 ]; then
  ## Required program not installed.
  echo "`date +%Y-%m-%d_%H:%M:%S` ERROR: fsarchiver not installed." >> ${LOGFILE}
  ErrorFlag=4
  f_cleanup
fi

## Mount the remote folder. ##
f_mount

if [ ! -f ${OFFSITETESTFILE} ]; then
  ## Could not find expected file on remote site.  Assuming failed mount.
  echo "`date +%Y-%m-%d_%H:%M:%S` --- ERROR: Cannot detect remote location: ${OFFSITETESTFILE}" >> ${LOGFILE}
  ErrorFlag=32
  f_cleanup
fi

StartTime="$(date +%s)"
echo "`date +%Y-%m-%d_%H:%M:%S` - Backup started." >> ${LOGFILE}

f_archive_fs boot /dev/sda1
f_archive_vol root
f_archive_vol home
f_archive_vol usr
f_archive_vol var
f_archive_vol srv
f_archive_vol opt
#f_archive_vol swap

## Unmount the Windows shared folder.
f_umount

## Calculate total time for backup.
FinishTime="$(date +%s)"
ElapsedTime="$(expr ${FinishTime} - ${StartTime})"
Hours=$((${ElapsedTime} / 3600))
ElapsedTime=$((${ElapsedTime} - ${Hours} * 3600))
Minutes=$((${ElapsedTime} / 60))
Seconds=$((${ElapsedTime} - ${Minutes} * 60))

echo "`date +%Y-%m-%d_%H:%M:%S` --- Total backup time: ${Hours} hour(s) ${Minutes} minute(s) ${Seconds} second(s)" >> ${LOGFILE}

echo "`date +%Y-%m-%d_%H:%M:%S` - Backup Finished." >> ${LOGFILE}
f_cleanup
Here is an example of the log file:
/var/log/back-parts.log
Code:
2012-06-28_18:19:36 - Backup started.
2012-06-28_18:19:46 --- Created: /bak/srv-ubuntu-boot.fsa, 40M
2012-06-28_18:19:46 --- Created: /bak/srv-ubuntu-home.fsa, 1M
2012-06-28_18:20:33 --- Created: /bak/srv-ubuntu-root.fsa, 96M
2012-06-28_18:20:44 --- Created: /bak/srv-ubuntu-opt.fsa, 1M
2012-06-28_18:20:55 --- Created: /bak/srv-ubuntu-srv.fsa, 1M
2012-06-28_18:22:21 --- Created: /bak/srv-ubuntu-usr.fsa, 162M
2012-06-28_18:23:28 --- Created: /bak/srv-ubuntu-var.fsa, 189M
2012-06-28_18:23:40 --- Backup time: 0 hour(s) 4 minute(s) 4 second(s)
2012-06-28_18:23:40 - Backup Finished.
An example email notification when a fatal error occured:
Code:
#### Still working on it ####
An example email notification when non-fatal errors occured:
Code:
#### Still working on it ####
An example email notification when no errors occur and email notifications turned on:
Code:
From: admin@mydomain.com
To: lhammonds@mydomain.com
Sent: Friday, June 29, 2012 10:36:45 AM
Subject: Backup Completed

INFO: The partition backup job has completed without any errors.

Server: srv-ubuntu
Program: /var/scripts/prod/back-parts.sh
Log: /var/log/back-parts.log
NOTE: If the snapshot volume could not be automatically removed, here is how you do it:
Code:
LVG-srv (252, 6)
LVG-tempsnap    (252, 9)
LVG-opt (252, 7)
LVG-swap        (252, 1)
LVG-root        (252, 0)
LVG-opt-real    (252, 10)
LVG-bak (252, 8)
LVG-tmp (252, 3)
LVG-tempsnap-cow        (252, 11)
LVG-usr (252, 4)
LVG-var (252, 5)
LVG-home        (252, 2)
Code:
dmsetup remove LVG-tempsnap
dmsetup remove LVG-tempsnap-cow
Backup Test
Before the partitions are backed on your server, create a couple of empty test files to verify that the restore in the next section will work.
Type the following commands:
Code:
touch /important.txt
touch /srv/samba/share/important.txt
Make sure the above files are included in your backup before testing the restore in the next section.


 Adv Reply
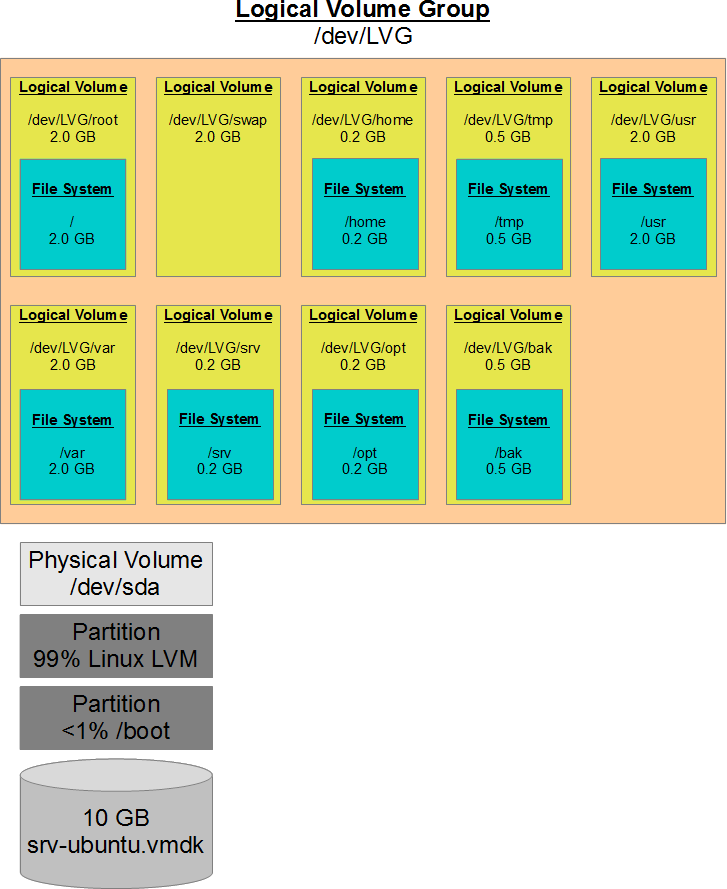

Bookmarks