Good afternoon folks! It has been about a year since I set up our last production Puppet server at work, and a lot has changed since then.
I spent a decent amount of time this morning figuring out some of the new quirks in the installation process, and I thought it would be worth documenting this process, in case I ever need to do it again, and in the spirit of helping the community.
Install a fresh copy of Ubuntu 12.04.
Just so we're on the same page, I am starting with a vanilla server, no previous Puppet installations present.
Configure Puppet Labs Apt Repository
This process has changed recently. Puppet Labs now recommends you download and run a deb package to install their PPA.
Code:
wget http://apt.puppetlabs.com/puppetlabs-release-precise.deb
Code:
sudo dpkg -i puppetlabs-release-precise.deb
Code:
sudo apt-get update
Install Puppetmaster
Code:
sudo apt-get install puppetmaster
Install Apache and Ruby
Code:
sudo apt-get install apache2
Code:
sudo apt-get install ruby1.8-dev
Code:
sudo apt-get install rubygems
Install Rack/Passenger
To complete this step, you will use gem, which you installed above by installing rubygems.
Code:
sudo gem install rack
Code:
sudo gem install passenger
Extra Packages Needed
Before we finish configuring Passenger to run with Apache, we'll need a few more packages. If you skip this step, the Passenger installer will tell you what packages to install, but if you started vanilla like I did, you will most likely need these packages.
Code:
sudo apt-get install libcurl4-openssl-dev libssl-dev zlib1g-dev apache2-prefork-dev libapr1-dev libaprutil1-dev
Setup Passenger and Apache
The below should be the command to launch the Passenger Installer. If you do not have this command, try running "updatedb" then "locate passenger-install-apache2-module" and you may find it in a non-standard bin location like "/var/lib/gems/1.8/gems/passenger-3.0.18/bin/passenger-install-apache2-module". When I did it on 10.04, I had that problem, but on 12.04 I was able to just proceed, because there was a file in /usr/local/bin/passenger-install-apache2-module.
Code:
sudo passenger-install-apache2-module
If it asks you to install any packages, go ahead and do that. But, the pre-emptive steps above should just make the installer succeed on the first try.
You will now see a lot of text going by, this is a normal software building and compiling procedure and you do not have to read the text.
As long as there are no obvious errors, you are OK to proceed to the next step once this finishes.
At the end of the step, it will give you some lines to add to your Apache configuration. Please copy these to your clipboard.
On my install, I am given these lines:
Code:
   LoadModule passenger_module /var/lib/gems/1.8/gems/passenger-3.0.18/ext/apache2/mod_passenger.so
   PassengerRoot /var/lib/gems/1.8/gems/passenger-3.0.18
   PassengerRuby /usr/bin/ruby1.8p
Please open /etc/apache2/apache2.conf in your favorite text editor (nano,vi,etc) and add those lines anywhere. I added them to the bottom of the file.
Do not worry about copying the sample VirtualHost configuration. I will be supplying you with a Puppet-specific configuration later in this how-to.
Enable SSL and Headers in Apache
Code:
sudo a2enmod headers
OPTIONAL, Configure Puppet for Automatic Certificate Signing
If you don't want to have to manually sign certificates, take this easy step.
Code:
sudo echo "*" > /etc/puppet/autosign.conf
Run Puppetmaster For The First And Last Time
Apache cannot setup the SSL keys needed for your Puppet server. Puppetmaster must be run one time in order for this to occur.
Code:
sudo service apache2 stop
Code:
sudo service puppetmaster restart
Assuming there are no errors, connect a client to the server. If all is successful, proceed.
Disable Puppetmaster Forever
Code:
sudo service puppetmaster stop
Code:
sudo update-rc.d -f puppetmaster remove
Configuration Files for Apache and Rack
For this step, you will need the latest source code for Puppet. At the time of this writing, you can obtain it at: http://info.puppetlabs.com/download-pe2.html
At the time of this writing, the latest Puppet version is 3.0.1, and can be obtained at this direct link:
http://puppetlabs.com/downloads/pupp...t-3.0.1.tar.gz
Code:
wget http://puppetlabs.com/downloads/puppet/puppet-3.0.1.tar.gz
Code:
gzip -d puppet-3.0.1.tar.gz
Code:
tar -xf puppet-3.0.1.tar
The files you want will be in puppet-3.0.1/ext/rack/files in the archive you just extracted.
Copy the Sample Apache Virtual Host Configuration to Sites-Available
Code:
sudo cp puppet-3.0.1/ext/rack/files/apache2.conf /etc/apache2/sites-available/puppetmaster
Create Rack Configuration Path
Code:
sudo mkdir -p /usr/share/puppet/rack/puppetmasterd
sudo mkdir -p /usr/share/puppet/rack/puppetmasterd/public
sudo mkdir -p /usr/share/puppet/rack/puppetmasterd/tmp
Copy the Sample config.ru to Rack Config Folder
Code:
sudo cp puppet-3.0.1/ext/rack/files/config.ru /usr/share/puppet/rack/puppetmasterd/config.ru
Minor Changes to Sample Configuration Files
Open the Apache Virtual Host configuration file in your favorite text editor:
/etc/apache2/sites-available/puppetmaster
Look at these lines:
Code:
        SSLCertificateFile      /etc/puppet/ssl/certs/squigley.namespace.at.pem
        SSLCertificateKeyFile   /etc/puppet/ssl/private_keys/squigley.namespace.at.pem
Change squigley.namespace.at.pem to the name of the certificate your Puppetmaster made for you. You can find that by running this command:
Code:
ls /var/lib/puppet/ssl/certs/
It should be yourserverhostname.pem.
It was also necessary for me to replace every instance of /etc/puppet/ssl/ with /var/lib/puppet/ssl/ because this is the default location for SSL files on Ubuntu.
I also had to replace /etc/puppet/rack/ instances in this file with /usr/share/puppet/rack/puppetmasterd/.
This sample Virtual Host configuration file has these changes made for my server "testserver".
Code:
# you probably want to tune these settings
PassengerHighPerformance on
PassengerMaxPoolSize 12
PassengerPoolIdleTime 1500
# PassengerMaxRequests 1000
PassengerStatThrottleRate 120
RackAutoDetect Off
RailsAutoDetect Off

Listen 8140

<VirtualHost *:8140>
        SSLEngine on
        SSLProtocol -ALL +SSLv3 +TLSv1
        SSLCipherSuite ALL:!ADH:RC4+RSA:+HIGH:+MEDIUM:-LOW:-SSLv2:-EXP

        SSLCertificateFile      /var/lib/puppet/ssl/certs/testserver.pem
        SSLCertificateKeyFile   /var/lib/puppet/ssl/private_keys/testserver.pem
        SSLCertificateChainFile /var/lib/puppet/ssl/ca/ca_crt.pem
        SSLCACertificateFile    /var/lib/puppet/ssl/ca/ca_crt.pem
        # If Apache complains about invalid signatures on the CRL, you can try disabling
        # CRL checking by commenting the next line, but this is not recommended.
        SSLCARevocationFile     /var/lib/puppet/ssl/ca/ca_crl.pem
        SSLVerifyClient optional
        SSLVerifyDepth  1
        # The `ExportCertData` option is needed for agent certificate expiration warnings
        SSLOptions +StdEnvVars +ExportCertData

        # This header needs to be set if using a loadbalancer or proxy
        RequestHeader unset X-Forwarded-For

        RequestHeader set X-SSL-Subject %{SSL_CLIENT_S_DN}e
        RequestHeader set X-Client-DN %{SSL_CLIENT_S_DN}e
        RequestHeader set X-Client-Verify %{SSL_CLIENT_VERIFY}e

        DocumentRoot /usr/share/puppet/rack/puppetmasterd/public/
        RackBaseURI /
        <Directory /usr/share/puppet/rack/puppetmasterd/>
                Options None
                AllowOverride None
                Order allow,deny
                allow from all
        </Directory>
</VirtualHost>
Activate The Apache Virtual Host
Code:
sudo ln -s /etc/apache2/sites-available/puppetmaster /etc/apache2/sites-enabled/puppetmaster
Make A Site.pp File
Site.pp is where Puppet stores all its manifest configuration for your clients. For now, we'll just make an empty default node declaration so Puppet doesn't throw any errors when running on the client.
Code:
# CONTENTS OF /etc/puppet/manifests/site.pp
node "default" { }
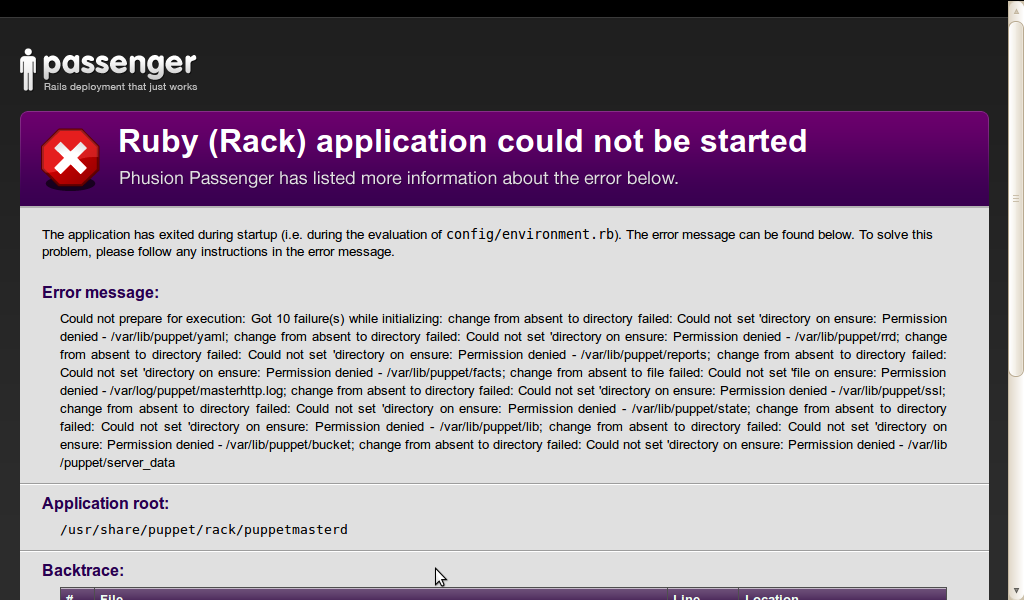
Fix File Permissions
If you do not do this, you may have unexpected errors.
Code:
sudo chown -R puppet:puppet /etc/puppet
sudo chown -R puppet:puppet /var/lib/puppet
sudo chown -R puppet:puppet /usr/share/puppet
Start Apache
Code:
sudo service apache2 restart
Once Apache starts, if there are no errors, your Puppet installation should be up-and-running with Passenger!
Troubleshooting Common Errors
PEM File Does Not Exist Or Is Empty: Jump up to the section "Minor Changes to Sample Configuration Files" and make sure your PEM file paths are correct.
BIND Address In Use: Puppetmaster is probably still running. I've found that sometimes the service script doesn't actually stop it. Run or reboot the server. That should fix that issue.
If you forgot to change your permissions on your files, you will get this output on your client:


 Adv Reply
Bookmarks