Page 2 of 4 FirstFirst 1234 LastLast
Results 11 to 20 of 35

Thread: How to Install and Configure an Ubuntu Server 12.04 LTS

  1. #11
    Join Date
    Sep 2011
    Location
    Behind you!
    Beans
    1,690
    Distro
    Ubuntu 20.04 Focal Fossa

    Re: How to Install and Configure an Ubuntu Server 12.04 LTS

    Quote Originally Posted by rubylaser View Post
    This is good stuff, and I'm sure will be helpful to many users. Thank you for taking the time to write all of this down.
    Thanks.

    Quote Originally Posted by rubylaser View Post
    If I may ask, is there a reason you're still using ESXi 4.1 instead of 5?
    There is a big reason. Price. VMware completely changed how they license their software. We purchased the system right after 4.1 released and designed our hardware based on VMware licensing. We basically pay for each processor in the server and can have unlimited amounts of RAM. But when they released 5.0, they changed it where we would have to pay based on how much RAM is "defined" for a VM. Yep, that's right. You pay $$ for setting up a server with 10GB of RAM regardless if the server actually uses that much.

    We currently have a bunch of Windows servers and many of which are serving similar purposes. Part of the reason I have been researching alternative operating systems is due to this cost change...looking for better-optimized systems that can work with smaller-defined amounts of RAM but make use of what it has rather than having a bunch of RAM leftover.

    LHammonds

  2. #12
    Join Date
    Jul 2010
    Location
    Michigan, USA
    Beans
    2,136
    Distro
    Ubuntu 18.04 Bionic Beaver

    Re: How to Install and Configure an Ubuntu Server 12.04 LTS

    Quote Originally Posted by LHammonds View Post
    Thanks.

    There is a big reason. Price. VMware completely changed how they license their software. We purchased the system right after 4.1 released and designed our hardware based on VMware licensing. We basically pay for each processor in the server and can have unlimited amounts of RAM. But when they released 5.0, they changed it where we would have to pay based on how much RAM is "defined" for a VM. Yep, that's right. You pay $$ for setting up a server with 10GB of RAM regardless if the server actually uses that much.

    We currently have a bunch of Windows servers and many of which are serving similar purposes. Part of the reason I have been researching alternative operating systems is due to this cost change...looking for better-optimized systems that can work with smaller-defined amounts of RAM but make use of what it has rather than having a bunch of RAM leftover.

    LHammonds
    That makes sense. I use ESXi 5 at home (non vSphere version, non-commercial use) so I can use up to 32GB of RAM for free. At work, we use a combination of Hyper-V for all of our Windows Server virtualization and Proxmox servers for everything else, so I haven't even looked at VMware's commercial pricing model since we abandoned ESX a few years ago. That is VERY disappointing to hear, and I completely understand. Thanks for the explaination.

  3. #13
    Join Date
    Sep 2011
    Location
    Behind you!
    Beans
    1,690
    Distro
    Ubuntu 20.04 Focal Fossa

    Re: How to Install and Configure an Ubuntu Server 12.04 LTS

    Quote Originally Posted by rubylaser View Post
    That is VERY disappointing to hear, and I completely understand.
    I am currently talking to my vendor about we will have to do when we will need to re-up our maintenance next year. They initially mentioned that we would be "forced" to upgrade to 5 when maintenance renew time arrived...of course I freaked out and I am having them do a bit more research to see if that is truly the case or if we can just get 5.0 licenses and convert them back to 4.1 licenses.

    The 5.0 licensing is probably a dream-come-true to hosting companies that charge for every VM that is spun up but it is completely worthless and overly-expensive to companies that host internally.

    Because of this, I am starting to look at alternatives. Most info on the net only mentions the big-name solutions and most of them completely ignore the Linux alternative. So I will be looking into the Linux solution myself to determine if we can make use of it or possible some other alternative.

    I might only have 1 year to come up with a viable alternative to VMware...kinda depends on what my vendor finds out regarding the maintenance renewal process and the 5.0 licensing scheme (yes, I say scheme with the devious meaning)

    I have heard of Proxmox but have not looked into it yet. Still busy with other projects.

    EDIT: Our vendor verified that we will NOT be forced to VMware 5.0 licensing when we renew our maintenance on 4.1. This is great news for me. I might still look into the Linux alternative if I have time later this year. If I do, I'll be sure to document my findings similar to these threads.

    LHammonds
    Last edited by LHammonds; June 28th, 2012 at 03:48 PM.

  4. #14
    Join Date
    Jun 2011
    Location
    The Shadow Gallery
    Beans
    6,744

    Re: How to Install and Configure an Ubuntu Server 12.04 LTS

    Before you type anymore here you might want to take a look at this http://ubuntuforums.org/showthread.php?t=1949027

    All tuts and how to's are moving to the wiki.


    Peace
    Backtrack - Giving machine guns to monkeys since 2006
    Kali-Linux - Adding a grenade launcher to the machine guns since 2013

  5. #15
    Join Date
    Sep 2011
    Location
    Behind you!
    Beans
    1,690
    Distro
    Ubuntu 20.04 Focal Fossa

    Re: How to Install and Configure an Ubuntu Server 12.04 LTS

    Quote Originally Posted by haqking View Post
    Before you type anymore here you might want to take a look at this http://ubuntuforums.org/showthread.php?t=1949027

    All tuts and how to's are moving to the wiki.
    Thanks. I am aware of this and have been in contact with cortman.

    I would never put a work-in-progress (like this) on an official wiki. Once I am done and happy with how I have this arranged, this will be the 1st of my tutorials that will get converted to the wiki.

    I will then update my other tutorials to incorporate this tutorial as a pre-requisite and convert them to wiki.

    But for right now, this is still a work in progress....but very close to being done. I have a few more scripts I want to include as well as cleaning up the language to read more like a book.

    LHammonds

  6. #16
    Join Date
    Sep 2011
    Location
    Behind you!
    Beans
    1,690
    Distro
    Ubuntu 20.04 Focal Fossa

    Re: How to Install and Configure an Ubuntu Server 12.04 LTS

    Backup Partitions Using LVM Snapshots and FSArchiver

    This method will allow online backup of the server at the partition level. It is designed to run via crontab schedule but can also be run manually.

    This should be considered a full backup which means you will probably need to rely on other methods for granular backups and restores such as using rsync at the file level.

    This method is great for backing up a system just prior to and just after a major upgrade of the OS or application. It is not very helpful for retrieving individual files although it could be done but would require a bit of work by temporarily restoring to an unused area, retrieving the file(s) and then destroying the temporary partition.

    The /bak partition is skipped because that is where the archives are being stored.

    The /tmp partition is skipped because there should not be anything in there that needs to be restored...but feel free to include it if you like.

    The script below was built around a few very basic commands that do the bulk of the work but most of the code is for error handling.

    Here are examples of the commands:
    Code:
    ## Create the snapshot volume of the partition to be backed up.
    lvcreate --size=5G --snapshot --name="tempsnap" /dev/LVG/root
    
    ## Create the compressed and encrypted archive of the snapshot.
    fsarchiver savefs --compress=7 --jobs=1 --cryptpass="abc123" --label="insert comment here" /bak/root.fsa /dev/LVG/tempsnap
    
    ## Create an informational text file about the archive.
    fsarchiver archinfo --cryptpass="abc123" /bak/root.fsa > /bak/root.txt 2>&1
    
    ## Remove the snapshot.
    lvremove --force /dev/LVG/tempsnap
    
    ## Create a checksum file about the archive.
    md5sum /bak/root.fsa > /bak/root.md5
    
    ## Verify that the checksum file can validate against the archive.
    md5sum --check /bak/root.md5
    Here is an example of a crontab entry to run the script once a day.

    /var/scripts/data/crontab.root
    Code:
    0 4 * * * /var/scripts/prod/back-parts.sh > /dev/null 2>&1
    Here is the script.

    /var/scripts/prod/back-parts.sh
    Code:
    #!/bin/bash
    #############################################################
    ## Name          : back-parts.sh (Backup Partitions)
    ## Version       : 1.0
    ## Date          : 2012-06-28
    ## Author        : LHammonds
    ## Purpose       : Backup partitions
    ## Compatibility : Verified on Ubuntu Server 12.04 LTS
    ## Requirements  : Fsarchiver, Sendemail, run as root
    ## Run Frequency : Once per day or as often as desired.
    ## Parameters    : None
    ## Exit Codes    :
    ##    0 = Success
    ##    1 = ERROR: Must be root user
    ##    2 = ERROR: Missing software
    ##    4 = ERROR: LVM problems
    ##    8 = ERROR: File creation problems
    ##   16 = ERROR: Mount/Unmount problems
    ###################### CHANGE LOG ###########################
    ## DATE       VER WHO WHAT WAS CHANGED
    ## ---------- --- --- ---------------------------------------
    ## 2012-06-28 1.0 LTH Created script.
    #############################################################


    #### Still working on it and testing various failure conditions. ####
    Here is an example of the log file:

    /var/log/back-parts.log
    Code:
    2012-06-28_18:19:36 - Backup started.
    2012-06-28_18:19:46 --- Created: /bak/srv-ubuntu-boot.fsa, 40M
    2012-06-28_18:19:46 --- Created: /bak/srv-ubuntu-home.fsa, 1M
    2012-06-28_18:20:33 --- Created: /bak/srv-ubuntu-root.fsa, 96M
    2012-06-28_18:20:44 --- Created: /bak/srv-ubuntu-opt.fsa, 1M
    2012-06-28_18:20:55 --- Created: /bak/srv-ubuntu-srv.fsa, 1M
    2012-06-28_18:22:21 --- Created: /bak/srv-ubuntu-usr.fsa, 162M
    2012-06-28_18:23:28 --- Created: /bak/srv-ubuntu-var.fsa, 189M
    2012-06-28_18:23:40 --- Backup time: 0 hour(s) 4 minute(s) 4 second(s)
    2012-06-28_18:23:40 - Backup Finished.
    An example email notification when a fatal error occured:
    Code:
    #### Still working on it ####
    An example email notification when non-fatal errors occured:
    Code:
    #### Still working on it ####
    An example email notification when no errors occur and email notifications turned on:
    Code:
    From: admin@mydomain.com
    To: lhammonds@mydomain.com
    Sent: Friday, June 29, 2012 10:36:45 AM
    Subject: Backup Completed
    
    INFO: The partition backup job has completed without any errors.
    
    Server: srv-ubuntu
    Program: /var/scripts/prod/back-parts.sh
    Log: /var/log/back-parts.log

    NOTE: If the snapshot volume could not be automatically removed, here is how you do it:

    Code:
    dmsetup ls
    Code:
    LVG-srv (252, 6)
    LVG-tempsnap    (252, 9)
    LVG-opt (252, 7)
    LVG-swap        (252, 1)
    LVG-root        (252, 0)
    LVG-opt-real    (252, 10)
    LVG-bak (252, 8)
    LVG-tmp (252, 3)
    LVG-tempsnap-cow        (252, 11)
    LVG-usr (252, 4)
    LVG-var (252, 5)
    LVG-home        (252, 2)
    Code:
    
    dmsetup remove LVG-tempsnap
    dmsetup remove LVG-tempsnap-cow
    
    Backup Test

    Before the partitions are backed on your server, create a couple of empty test files to verify that the restore in the next section will work.

    Type the following commands:

    Code:
    
    touch /important.txt
    touch /srv/samba/share/important.txt
    
    Make sure the above files are included in your backup before testing the restore in the next section.
    Last edited by LHammonds; June 29th, 2012 at 04:42 PM.

  7. #17
    Join Date
    Sep 2011
    Location
    Behind you!
    Beans
    1,690
    Distro
    Ubuntu 20.04 Focal Fossa

    Re: How to Install and Configure an Ubuntu Server 12.04 LTS

    Restore Partitions Using SystemRescueCD and FSArchiver

    Partitions cannot be mounted when restoring to them. If services can be stopped that use files on a specific partition, it can be unmounted and restored. However, the root partition can never be restore while the server is online so these instructions will cover the common denominator which requires taking the server offline.

    The server needs to be booted up with a CD but not just any CD will do because it needs to have FSArchiver on it. For this document, the ISO image from www.sysresccd.org will be used.

    Once downloaded, the ISO can be burned to a CD-ROM disc or uploaded to your ISO repository such as a LUN. VMware and VirtualBox can attach an ISO image and mount it in the CD-ROM device to allow the virtual machine to boot the ISO image.

    For this example, the root and srv partitions will be restored.

    Be sure the partitions have been backed up and the files are sitting in the /bak volume.

    Code:
    ls -l /bak
    Code:
    -rw-r--r-- 1 root root  41515916 Jun 28 18:19 srv-ubuntu-boot.fsa
    -rw-r--r-- 1 root root        59 Jun 28 18:19 srv-ubuntu-boot.md5
    -rw-r--r-- 1 root root       732 Jun 28 18:19 srv-ubuntu-boot.txt
    -rw-r--r-- 1 root root      8467 Jun 28 18:19 srv-ubuntu-home.fsa
    -rw-r--r-- 1 root root        59 Jun 28 18:19 srv-ubuntu-home.md5
    -rw-r--r-- 1 root root       730 Jun 28 18:19 srv-ubuntu-home.txt
    -rw-r--r-- 1 root root      5045 Jun 28 18:20 srv-ubuntu-opt.fsa
    -rw-r--r-- 1 root root        58 Jun 28 18:20 srv-ubuntu-opt.md5
    -rw-r--r-- 1 root root       729 Jun 28 18:20 srv-ubuntu-opt.txt
    -rw-r--r-- 1 root root  99626058 Jun 28 18:20 srv-ubuntu-root.fsa
    -rw-r--r-- 1 root root        59 Jun 28 18:20 srv-ubuntu-root.md5
    -rw-r--r-- 1 root root       732 Jun 28 18:20 srv-ubuntu-root.txt
    -rw-r--r-- 1 root root      5458 Jun 28 18:20 srv-ubuntu-srv.fsa
    -rw-r--r-- 1 root root        58 Jun 28 18:21 srv-ubuntu-srv.md5
    -rw-r--r-- 1 root root       728 Jun 28 18:20 srv-ubuntu-srv.txt
    -rw-r--r-- 1 root root 169110383 Jun 28 18:22 srv-ubuntu-usr.fsa
    -rw-r--r-- 1 root root        58 Jun 28 18:22 srv-ubuntu-usr.md5
    -rw-r--r-- 1 root root       730 Jun 28 18:22 srv-ubuntu-usr.txt
    -rw-r--r-- 1 root root 198015579 Jun 28 18:23 srv-ubuntu-var.fsa
    -rw-r--r-- 1 root root        58 Jun 28 18:23 srv-ubuntu-var.md5
    -rw-r--r-- 1 root root       730 Jun 28 18:23 srv-ubuntu-var.txt
    As a little test of the restore, let's delete the two text files created in the previous section:

    Code:
    
    rm /important.txt
    rm /srv/samba/share/important.txt
    
    These files should have been included in the backup image. When the restore is complete, these files should return.

    Insert the CDROM (or mount the ISO image) and boot the server with it.

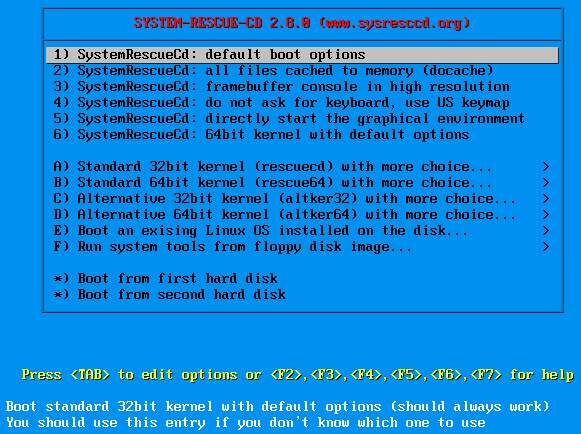
    Here is the 1st screen:


    The server in this document is a 64-bit server so option #6 was chosen.

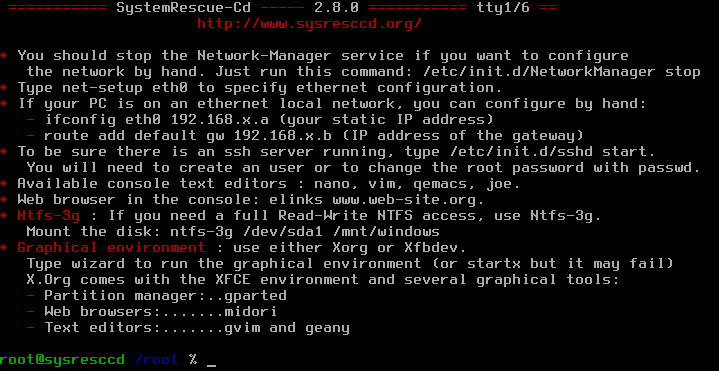
    The next screen takes you to the command prompt:


    root@sysresccd /root % mkdir /mnt/test
    root@sysresccd /root % fsarchiver probe simple
    Code:
    [======DISK======] [=============NAME==============] [====SIZE====] [MAJ] [MIN]
    [sda             ] [Virtual disk                   ] [    10.00 GB] [  8] [  0]
    [sdb             ] [Virtual disk                   ] [    12.00 GB] [  8] [ 16]
    [sdc             ] [Virtual disk                   ] [    12.00 GB] [  8] [ 32]
    [sr0             ] [VMware IDE CDR10               ] [   378.96 MB] [ 11] [  0]
    
    [=====DEVICE=====] [==FILESYS==] [======LABEL======] [====SIZE====] [MAJ] [MIN]
    [loop0           ] [squashfs   ] [<unknown>        ] [   297.63 MB] [  7] [  0]
    [sda1            ] [ext2       ] [boot             ] [   190.00 MB] [  8] [  1]
    [sda5            ] [LVM2_member] [<unknown>        ] [     9.81 GB] [  8] [  5]
    [sdb1            ] [LVM2_member] [<unknown>        ] [    12.00 GB] [  8] [ 17]
    [sdc1            ] [LVM2_member] [<unknown>        ] [    12.00 GB] [  8] [ 33]
    [dm-0            ] [ext4       ] [root             ] [     3.00 GB] [253] [  0]
    [dm-1            ] [swap       ] [<unknown>        ] [     1.86 GB] [253] [  1]
    [dm-2            ] [ext4       ] [home             ] [     1.00 GB] [253] [  2]
    [dm-3            ] [ext4       ] [tmp              ] [     2.00 GB] [253] [  3]
    [dm-4            ] [ext4       ] [usr              ] [     3.00 GB] [253] [  4]
    [dm-5            ] [ext4       ] [var              ] [     3.00 GB] [253] [  5]
    [dm-6            ] [ext4       ] [srv              ] [     2.00 GB] [253] [  6]
    [dm-7            ] [ext4       ] [opt              ] [     2.00 GB] [253] [  7]
    [dm-8            ] [ext4       ] [bak              ] [     4.00 GB] [253] [  8]
    root@sysresccd /root % mkdir /bak
    root@sysresccd /root % mount --read-only /dev/dm-8 /bak
    root@sysresccd /root % ls -l /bak
    Code:
    -rw-r--r-- 1 root root  41515916 Jun 28 18:19 srv-ubuntu-boot.fsa
    -rw-r--r-- 1 root root        59 Jun 28 18:19 srv-ubuntu-boot.md5
    -rw-r--r-- 1 root root       732 Jun 28 18:19 srv-ubuntu-boot.txt
    -rw-r--r-- 1 root root      8467 Jun 28 18:19 srv-ubuntu-home.fsa
    -rw-r--r-- 1 root root        59 Jun 28 18:19 srv-ubuntu-home.md5
    -rw-r--r-- 1 root root       730 Jun 28 18:19 srv-ubuntu-home.txt
    -rw-r--r-- 1 root root      5045 Jun 28 18:20 srv-ubuntu-opt.fsa
    -rw-r--r-- 1 root root        58 Jun 28 18:20 srv-ubuntu-opt.md5
    -rw-r--r-- 1 root root       729 Jun 28 18:20 srv-ubuntu-opt.txt
    -rw-r--r-- 1 root root  99626058 Jun 28 18:20 srv-ubuntu-root.fsa
    -rw-r--r-- 1 root root        59 Jun 28 18:20 srv-ubuntu-root.md5
    -rw-r--r-- 1 root root       732 Jun 28 18:20 srv-ubuntu-root.txt
    -rw-r--r-- 1 root root      5458 Jun 28 18:20 srv-ubuntu-srv.fsa
    -rw-r--r-- 1 root root        58 Jun 28 18:21 srv-ubuntu-srv.md5
    -rw-r--r-- 1 root root       728 Jun 28 18:20 srv-ubuntu-srv.txt
    -rw-r--r-- 1 root root 169110383 Jun 28 18:22 srv-ubuntu-usr.fsa
    -rw-r--r-- 1 root root        58 Jun 28 18:22 srv-ubuntu-usr.md5
    -rw-r--r-- 1 root root       730 Jun 28 18:22 srv-ubuntu-usr.txt
    -rw-r--r-- 1 root root 198015579 Jun 28 18:23 srv-ubuntu-var.fsa
    -rw-r--r-- 1 root root        58 Jun 28 18:23 srv-ubuntu-var.md5
    -rw-r--r-- 1 root root       730 Jun 28 18:23 srv-ubuntu-var.txt
    root@sysresccd /root % md5sum --check /bak/srv-ubuntu-srv.md5
    Code:
    /bak/srv-ubuntu-srv.fsa: OK
    root@sysresccd /root % fsarchiver restfs --cryptpass="abc123" /bak/srv-ubuntu-srv.fsa id=0,dest=/dev/dm-6
    Code:
    Statistics for filesystem 0
    * files successfully processed:....regfiles=1, directories=4, symlinks=0, hardlinks=0, specials=0
    * files with errors:...............regfiles=0, directories=0, symlinks=0, hardlinks=0, specials=0
    root@sysresccd /root % mount --read-only /dev/dm-6 /mnt/test
    root@sysresccd /root % ls -l /mnt/test/samba/share
    Code:
    -rw-r--r-- 1 root root 0 Jun 28 09:21 important.txt
    root@sysresccd /root % umount /mnt/test
    root@sysresccd /root % md5sum --check /bak/srv-ubuntu-root.md5
    Code:
    /bak/srv-ubuntu-root.fsa: OK
    root@sysresccd /root % fsarchiver restfs --cryptpass="abc123" /bak/srv-ubuntu-root.fsa id=0,dest=/dev/dm-0
    Code:
    Statistics for filesystem 0
    * files successfully processed:....regfiles=8938, directories=1693, symlinks=855, hardlinks=11, specials=80
    * files with errors:...............regfiles=0, directories=0, symlinks=0, hardlinks=0, specials=0
    root@sysresccd /root % mount --read-only /dev/dm-0 /mnt/test
    root@sysresccd /root % ls -l /mnt/test
    Code:
    drwxr-xr-x   3 root root  1024 Jun 27 12:25 bak
    drwxr-xr-x   2 root root  4096 Jun 26 12:37 bin
    drwxr-xr-x   4 root root  1024 Jun 26 12:36 boot
    drwxr-xr-x  14 root root  4400 Jun 28 09:17 dev
    drwxr-xr-x  90 root root  4096 Jun 28 09:17 etc
    drwxr-xr-x   4 root root  1024 Jun 26 10:20 home
    -rw-r--r--   1 root root     0 Jun 28 09:20 important.txt
    lrwxrwxrwx   1 root root    33 Jun 26 10:33 initrd.img -> /boot/initrd.img-3.2.0-25-generic
    lrwxrwxrwx   1 root root    33 Jun 26 10:16 initrd.img.old -> /boot/initrd.img-3.2.0-23-generic
    drwxr-xr-x  17 root root  4096 Jun 26 12:34 lib
    drwxr-xr-x   2 root root  4096 Jun 26 10:16 lib64
    drwx------   2 root root 16384 Jun 26 10:15 lost+found
    drwxr-xr-x   4 root root  4096 Jun 26 10:16 media
    drwxr-xr-x   3 root root  4096 Jun 26 12:35 mnt
    drwxr-xr-x   3 root root  1024 Jun 26 10:15 opt
    dr-xr-xr-x 111 root root     0 Jun 28 09:17 proc
    drwx------   3 root root  4096 Jun 26 19:57 root
    drwxr-xr-x  15 root root   500 Jun 28 09:18 run
    drwxr-xr-x   2 root root  4096 Jun 26 12:37 sbin
    drwxr-xr-x   2 root root  4096 Mar  5 11:54 selinux
    drwxr-xr-x   4 root root  1024 Jun 28 08:34 srv
    drwxr-xr-x  13 root root     0 Jun 28 09:17 sys
    drwxrwxrwt   4 root root  1024 Jun 28 09:18 tmp
    drwxr-xr-x  11 root root  4096 Jun 26 10:16 usr
    drwxr-xr-x  14 root root  4096 Jun 26 13:08 var
    lrwxrwxrwx   1 root root    29 Jun 26 10:33 vmlinuz -> boot/vmlinuz-3.2.0-25-generic
    lrwxrwxrwx   1 root root    29 Jun 26 10:16 vmlinuz.old -> boot/vmlinuz-3.2.0-23-generic
    root@sysresccd /root % umount /mnt/test

    Eject the CDROM/ISO and reboot the server.

    If it worked right, the server will boot up (we restored the root file system) and the test files should have been restored.

    NOTE: If you noticed any ext file systems that had <unknown> labels, you can update them using the tune2fs command. Example 1: tune2fs /dev/sda1 -L boot, Example 2: tune2fs /dev/dm-0 root
    Last edited by LHammonds; June 29th, 2012 at 03:45 PM.

  8. #18
    Join Date
    Sep 2011
    Location
    Behind you!
    Beans
    1,690
    Distro
    Ubuntu 20.04 Focal Fossa

    Re: How to Install and Configure an Ubuntu Server 12.04 LTS

    Crontab Schedule

    The crontab schedule can be edited directly by typing "crontab -e" but that can be a bit dangerous. It would be safer to edit a file and then load that file into the schedule. This will allow backups of the schedule to be made. If there is ever a problem with the schedule, it can be re-loaded with a known-good schedule or at least back to the way it was before the last change. This requires the person doing the editing to always work with a copy of the schedule 1st.

    Here is an example crontab scheduling file for the root user:

    /var/scripts/data/crontab.root
    Code:
    ########################################
    # Name: Crontab Schedule for root user
    # Author: LHammonds
    ############# Update Log ###############
    # 2012-05-20 - LTH - Created schedule
    ########################################
    
    SHELL=/bin/sh
    PATH=/usr/local/sbin:/usr/local/bin:/sbin:/bin:/usr/sbin:/usr/bin
    
    # Crontab SYNTAX:
    # minute(0-59) hour(0-23) day-of-month(1-31) month(1-12) day-of-week(0-6) command-to-execute
    #
    # Adjust the time clock
    #
    0 1-23 * * * /usr/sbin/ntpdate ntp.ubuntu.com > /dev/null 2>&1
    #
    # Backup MySQL Server
    #
    0 23 * * * /var/scripts/prod/mysql-backup.sh > /dev/null 2>&1
    #
    # Backup MySQL Database On Demand
    #
    0-59 * * * * /var/scripts/prod/mysql-db-backup.sh > /dev/null 2>&1
    #
    # Daily checks for available space
    #
    0 1 * * * /var/scripts/prod/check-storage.sh root 500 100 > /dev/null 2>&1
    15 1 * * * /var/scripts/prod/check-storage.sh home 100 50 > /dev/null 2>&1
    30 1 * * * /var/scripts/prod/check-storage.sh tmp 100 50 > /dev/null 2>&1
    45 1 * * * /var/scripts/prod/check-storage.sh usr 100 50 > /dev/null 2>&1
    0 2 * * * /var/scripts/prod/check-storage.sh var 100 50 > /dev/null 2>&1
    15 2 * * * /var/scripts/prod/check-storage.sh srv 100 50 > /dev/null 2>&1
    30 2 * * * /var/scripts/prod/check-storage.sh opt 100 50 > /dev/null 2>&1
    45 2 * * * /var/scripts/prod/check-storage.sh bak 100 50 > /dev/null 2>&1
    #
    # Daily software upgrade check
    #
    0 3 * * * /var/scripts/prod/apt-upgrade.sh > /dev/null 2>&1
    Once the file is created, make sure appropriate permissions are set by typing the following:
    Code:
    chown root:root /var/scripts/data/crontab.root
    chmod 0600 /var/scripts/data/crontab.root
    To enable the root schedule using this file, type the following:

    Code:
    crontab -u root /var/scripts/data/crontab.root
    To disable the root schedule, type the following:
    Code:
    touch /tmp/deleteme
    crontab -u root /tmp/deleteme
    rm /tmp/deleteme
    If you need to modify the schedule, make a backup copy 1st. For example:

    Code:
    cp /var/scripts/data/crontab.root /var/scripts/data/2012-11-28-crontab.root
    vi /var/scripts/data/crontab.root (make your changes)
    crontab -u root /var/scripts/data/crontab.root

  9. #19
    Join Date
    Jun 2007
    Location
    Paraparaumu, New Zealand
    Beans
    Hidden!

    Re: How to Install and Configure an Ubuntu Server 12.04 LTS

    Quote Originally Posted by LHammonds View Post
    ** Post Reserved **

    Backup Process
    Quote Originally Posted by LHammonds View Post
    ** Post Reserved **

    Restore Process
    Just so you're aware, a new policy was recently introduced onto the forum that can prevent editing of posts after a day or so.
    Forum DOs and DON'Ts
    Please use CODE tags
    Including your email address in a post is not recommended
    My Blog

  10. #20
    Join Date
    Sep 2011
    Location
    Behind you!
    Beans
    1,690
    Distro
    Ubuntu 20.04 Focal Fossa

    Re: How to Install and Configure an Ubuntu Server 12.04 LTS

    Quote Originally Posted by lisati View Post
    Just so you're aware, a new policy was recently introduced onto the forum that can prevent editing of posts after a day or so.
    Well, that would make posting works-in-progress here pointless.

    Is that for certain sub-forums or site-wide? Got a link to that policy?

Page 2 of 4 FirstFirst 1234 LastLast

Tags for this Thread

Bookmarks

Posting Permissions

  • You may not post new threads
  • You may not post replies
  • You may not post attachments
  • You may not edit your posts
  •