Page 1 of 3 123 LastLast
Results 1 to 10 of 21

Thread: Creating and Utilzing a PGP Key

  1. #1
    Join Date
    Apr 2007
    Location
    Pennsylvania
    Beans
    107
    Distro
    Ubuntu 9.04 Jaunty Jackalope

    Creating and Utilzing a PGP Key

    This tutorial can be used to help any users to set up OpenPGP to encrypt/decrypt files or send and recieved encrypted e-mails.

    I will attach my public key that I used for this. If you want to contact me concerning this tutorial please use that key. Any other reason you can use my regular public key.

    Creating your PGP Key
    Using PGP is a thing of the present and future. But you need to purchase PGP to utilize it if you are running windows. In Ubuntu there is a way that you can utilize what is known as OpenPGP. This is the same thing but a freeware version of PGP. PGP can be used to encrypt/decrypt files and communications such as e-mail.

    I use it for communications via e-mail since I deal with account information on a website that they do not like having plain text e-mails concerning that being sent.


    First we ant to go to Applications then Accessories and select Passwords and Encryption Keys. This is the area that houses all information relating to OpenPGP and SSH keys. On you load this program it should look like something like this if you have never ran it before:


    This currently shows that we have no private keys for OpenPGP or SSH in here. This tutorial will show you how to create and find remote PGP Keys. My next tutorial will discuss SSH Key which can be used to connect to launchpad.net


    When you click new you will be prompted to create a new PGP or SSH key. You will want to create a PGP key.


    When you click new PGP Key and click next you get something that looks like the following. At this screen you need to enter your name “Michael Brown” your e-mail address “michaelbrown2009@gmail.com” and a comment if you want. I added PGP Tutorial Key not widely used.

    You can see all of this at this screen:


    You can keep the Encryption type and the strength to the default levels. If you wish to up the bits field you can do so it will only increase your keys overall security. When you click create it will ask you to enter your passphrase. This is the passphrase that you will use to if someone encrypts a file or an e-mail.

    You need to enter this and confirm it. After you are done it should look something like the following:


    As you can see my passphrase is not long enough. This should be like 15 to 20 characters I would say. I would not make it any shorter but you can of course make it longer. As you see in this image the Okay button is grayed out. This shows that the two passwords or passphrases are not the same. I went back and made they were the same.

    After you click Okay you will get this page:


    and will tell you what phase it is at with creating your new key. This step will take a while if you selected 4096 or anything above the default number for the bits. I did it 4096 as a way to show you how long it may take and it will be harder to break.

    After it is completed you will see the following:


    Your key has been created. It is really that easy.

  2. #2
    Join Date
    Apr 2007
    Location
    Pennsylvania
    Beans
    107
    Distro
    Ubuntu 9.04 Jaunty Jackalope

    Part 2: Tutorial: Syncing your PGP Key with Key Server

    Publishing Your Key

    You will have to click on Remote and then “Sync and Publish Keys” You can see this with the following screen shot:


    After you select this option you get the following message:


    You want to click on Key Servers. This will give you the ability to add Key Servers that you can send your keys to and select which one you send your key to.


    You want to select the keyserver.ubuntu.com server to publish your keys to. This will send it out to the MIT and PGP key servers.


    When you click Close you will be brought tot he above screen again. The only difference is that the Sync button is not grayed out. When you click Sync it will send it to the ubuntu server.


    You will see this. It will connect, and sync the keys on the server. After it is done it will close and go back to the main window for Passwords and Encryption Keys.

  3. #3
    Join Date
    Apr 2007
    Location
    Pennsylvania
    Beans
    107
    Distro
    Ubuntu 9.04 Jaunty Jackalope

    Part 3: Downloading Public Key from the Key Server

    Getting a Key
    It is very easy to go and download a key from the server. You will need to know the Key/PGP ID or the e-mail used. I have several keys that I used years ago that I forgot about.

    You will want to click on Remote and then find remote keys.


    This dialog box will pop up. This will allow you to search via anything you can think of. I am searching for my production key that I use. I enter my e-mail address “michaelbrown2009@gmail.com”.

    After you click on search if it finds anything it will look like this:


    The one that we want to download is the one that I have selected. This key has the ID of 120867BB.


    After you have selected the key you want to click on import. It will import it with any other prompts. At this point you can click on close. To verify you imported the public key you can click on the Other Collected Keys.


    As you can see it was imported correctly. That is all.

    That is how you download and sync a key on a remote server.

  4. #4
    Join Date
    Apr 2007
    Location
    Pennsylvania
    Beans
    107
    Distro
    Ubuntu 9.04 Jaunty Jackalope

    Part 4: Tutorial: Using your PGP Key to Encrypt Files

    Utilizing your Private Key

    File Encryption
    You can utilize your private key for e-mail and files. I will show you an easy way to encrypt a file. This is done through the command line. There are several other programs that you can use that have a GUI interface. I prefer to encrypt files through a command line interface because it is relatively easy.

    I have a file that is whatToDo.txt on my desktop. First you need to open a terminal by going to Applications -> Accessories → Terminal (Note: I have changed the color's on mine so it will look slightly different. When terminal loads it should look something like the following:


    Since my file that I want to decrypt is on the desktop. You need to change directory to the Desktop


    After you change directory (cd) to the directory that you have the file in you have to enter a command that is very easy. That command is #gpg -c filename. This will encrypt the file utilizing a symmetric cipher.


    The first password/passphrase window will look like the following:


    After you enter your passphrase and click on Ok you will be prompted with a second passphrase dialog box.


    After you click okay it will go back to the terminal. One of two things will happen You will get the following error:

    “gpg: error creating passphrase: invalid passphrase
    gpg: symmetric encryption of `what to do.txt' failed: invalid passphrase ”

    In this case you will have to do the above steps again because you entered your passphrase in correctly.

    The other event that could happen is that it just goes back to the regular prompt. This means that the encryption has been done successfully. To verify this you can run the ls -al command to see if there are any .gpg files. If there are with the same name of your original file then you have completed encrypting a file successfully.


    You can see here by the highlightedd text that the encryption of what to do.txt was successful because there is a file named what to do.txt.gpg. GPG is the extension used for encrypted files.

  5. #5
    Join Date
    Apr 2007
    Location
    Pennsylvania
    Beans
    107
    Distro
    Ubuntu 9.04 Jaunty Jackalope

    Part 5: Tutorial: Using your PGP Key to Decrypt Files

    Utilizing your Private Key

    File Decryption
    It is very easy to decrypt files in ubuntu through the command line as well. It is really easy compared everything else that we have covered. With terminal open cd into the directory that has the .gpg file extension. At the prompt all you have to type in is gpg filename.extention.gpg or filename.gpg. If you have a file like a text file that you encrypt the extension should be something like .txt.gpg.


    After you run this command it will ask you to enter your password in a dialog box.


    When you click okay you will given the following option if you have the original file still in the same directory.


    You can yes 'y' and hit enter. You may get this message


    After this you can type in ls -al to see everything in that directory. You will want to make sure you have a file by that filename but with the original extension and not the .gpg extension.


    As you can see we have this completed. There is the encrypted what to do.txt.gpg file and now a what to do.txt file. To verify that the contents are original you can run gedit what to do.txt


    After you hit enter you will get the contents of the file using the editor gedit.


    The above is my file. I keep a file of things I need to complete to help me with my time management skills.

    You can use the following command to decrypt the file with a different file name
    $ gpg myfinancial.info.gpg –o vivek.info.txt

    If the file has the .gpg extention it is a binary encrypted file and if it is .asc it is an ASCII encrypted file.
    Last edited by daboroe; May 3rd, 2009 at 10:59 PM.

  6. #6
    Join Date
    Apr 2007
    Location
    Pennsylvania
    Beans
    107
    Distro
    Ubuntu 9.04 Jaunty Jackalope

    Part 7a: Encrypting / Decrypting e-mail

    I found out that the easiest e-mail client to use to encrypt and decrypt e-mails is Mozilla Thunderbird. I use Windows and Ubuntu so I once used Outlook until I found it hard to do this. I only run Thunderbird now.

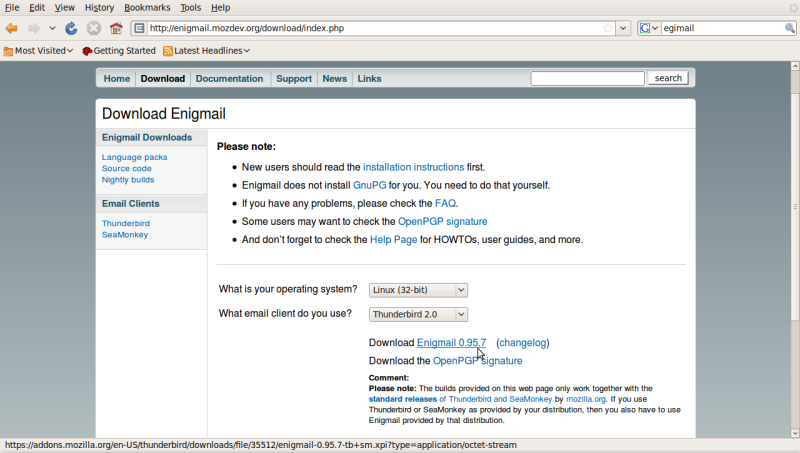
    What to do first is to download the enigmail add on for Thunderbird. This add on allows the thunderbird access to the open pgp keys. To download go to: http://enigmail.mozdev.org/download/index.php. You can download the .xpi file and the .asc file. The .asc file is the OpenPGP signature for the .xpi file that you need for Thunderbird. Some users may want to use it to verify the file.


    Click on the link for Enigmail 0.95.7 if the information is correct. If you are runing 64 bit ubuntu use the Linux (64 bit). Download and save it to your desktop.


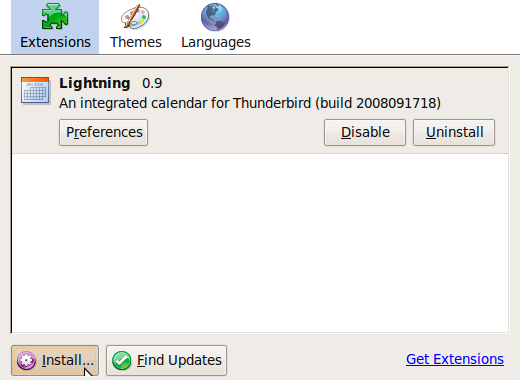
    Once it is downloaded load Thunderbird. Go to Tools → Add Ons.


    You want to select Install. After this it will bring a dialog box that will ask you to select the .xpi fil


    This shows you that I have selected the enigmail.xpi file which is on my desktop. After I have it selected click open.


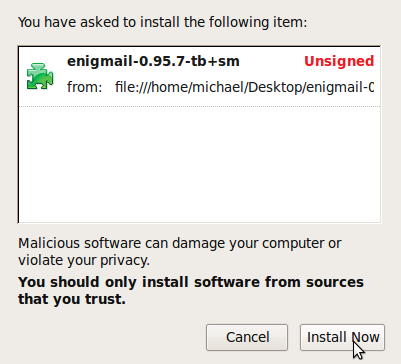
    It will bring up the above dialog box. You will have to wait several seconds before you can install it. When you can click on install now do so.


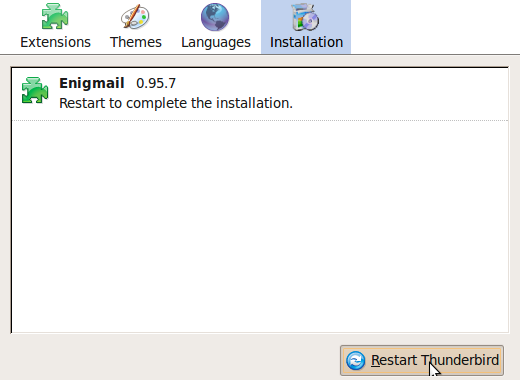
    You will get this dialog box when it is done. Since you have added an addon on in Thunderbird like Mozilla the program has to restart before it can be used. Click on Restart Thunderbird.

    When you restart you have access to the program.

    After the program loads go to Edit → Account Settings.


    After you select Account Settings you will get the following dialog box.


  7. #7
    Join Date
    Apr 2007
    Location
    Pennsylvania
    Beans
    107
    Distro
    Ubuntu 9.04 Jaunty Jackalope

    Re: Part 7b: Encrypting / Decrypting e-mail

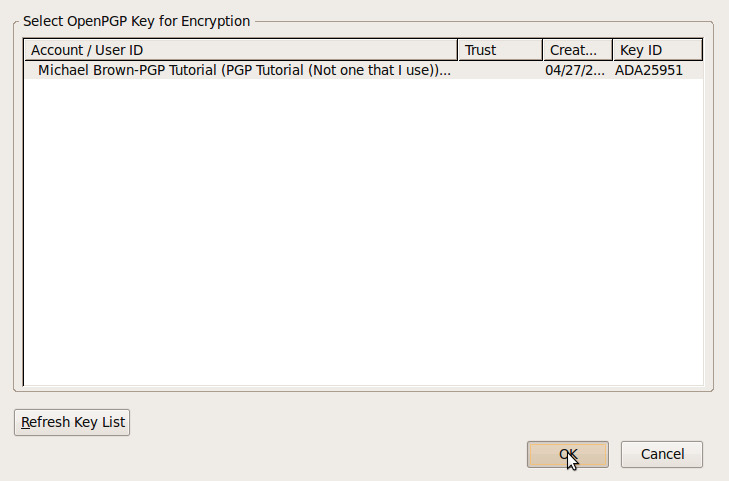
    You will want to select a specific key if you have many. I do this anyways when I only have one key.


    I select my PGP Tutorial one. This way I know that this specific e-mail account will be using this key. You can set up a key for each email account but I just use one for all of my e-mail accounts.

    You want to select Ok twice. After this you will want to create a new email.


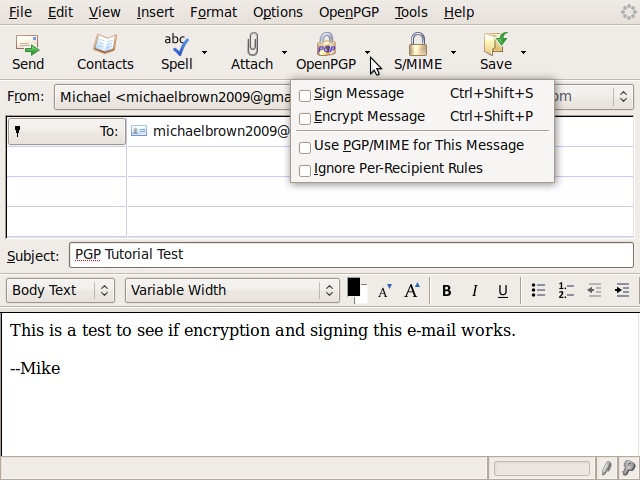
    I wrote a small e-mail stating that this is a test for encryption and signing of the e-mail. I am just sending it to myself to test it out. If you were sending this to a real person other than yourself the precipitant would have to have your public key.


    What you want to do is click the down arrow beside OpenPGP. You want to select Sign Message and Encrypt Message. This will encrypt it so only you and the person you are sending to can read it and you will sign it with your digital PGP key.

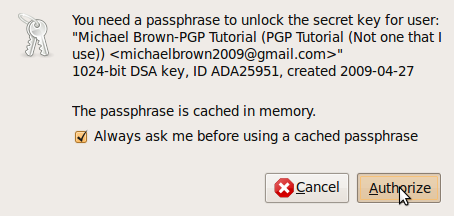
    You will be asked to convert it to plain text if you are using HTML. Click yes. Next you will be asked to enter your passphrase or authorize passphrase access if the passphrase is in memory.


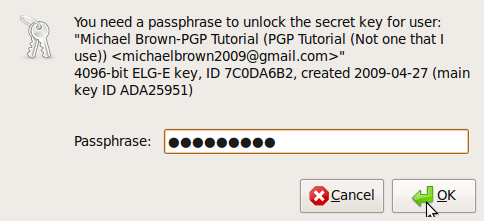
    This will send it out to the recipient. When you get it and click on the e-mail it will ask you to enter your passphrase so you can decrypt it.


    If you enter it correctly it will display the decrypted e-mail.

    The decrypted e-mail looks like this:


    The addon that we installed in Thunderbird gives you some information in the green area. It states that the signature is good and valid. It would also tell you if it was not for any apparent reason.

    Remember this once was encrypted and by clicking on the e-mail when we wanted to open it up and entering in the passphrase decrypted it. Anytime in the future you will have to enter your passphrase to view this e-mail. If the passphrase is in memory it will ask you to authorize to use it.

    That is how you encrypt/decrypt and sign e-mails through Thunderbird.

  8. #8
    Join Date
    Apr 2007
    Location
    Pennsylvania
    Beans
    107
    Distro
    Ubuntu 9.04 Jaunty Jackalope

    Part 8: Other Information

    Command Line information and FAQ coming soon (should be done by today; May 10, 2009)

    This section will incorporate the following information
    • Command Line Key Creation
    • Command Line Key Server Syncing
    • FAQ


    Command Line Key Creation
    First you will need to use the key that creates your key
    Code:
    gpg --gen-key
    This will run the key generating wizard as I call it. The next step is to select what type of kind of key you will like. The choices are DSA & Elgamal, DSA and RSA. If you want it to do encryption then you need to choose DSA & Elgamal.

    Code:
    Please select what kind of key you want:
       (1) DSA and Elgamal (default)
       (2) DSA (sign only)
       (5) RSA (sign only)
    Next it will ask you for the keysize. The default is 2048. I choose to be 4096. The more bits the harder it will be to crack your key.

    Code:
    DSA keypair will have 1024 bits.
    ELG-E keys may be between 1024 and 4096 bits long.
    What keysize do you want? (2048) 4096
    Requested keysize is 4096 bits
    Next it will request you say how long the key will be good for. The default value for this is 0. This indicates it will never expire. You can specify <n>w, <m>m <n> y. w= weeks; m=months and y=years. It will then request you to confirm it all.
    Code:
    Please specify how long the key should be valid.
             0 = key does not expire
          <n>  = key expires in n days
          <n>w = key expires in n weeks
          <n>m = key expires in n months
          <n>y = key expires in n years
    Key is valid for? (0) 0
    Key does not expire at all
    Is this correct? (y/N)
    If this is all right then type in 'Y' and hit enter. If not type in 'N' and hit enter.

    It will then request you to enter a user id to identify the key. It will go through and ask you to enter several pieces of information. The first one is your full name, then your email address and finally a comment. You can see below what I entered for mine.

    Code:
    You need a user ID to identify your key; the software constructs the user ID
    from the Real Name, Comment and Email Address in this form:
        "Heinrich Heine (Der Dichter) <heinrichh@duesseldorf.de>"
    
    Real name: Michael Brown - Test
    Email address: michaelbrown2009@gmail.com
    Comment: PGP Command Line Test
    You selected this USER-ID:
        "Michael Brown - Test (PGP Command Line Test) <michaelbrown2009@gmail.com>"
    It will ask if you want to change the name, comment, email or if it is okay or quit. If everything is correct type in o. If you want to change the name type in n, for the comment, type in C, for the e-mail address type in E.

    It will then request you enter a passphrase. It will give you one dialog box. This box will be for you to enter your passphrase. It will open another dialog box requesting you to enter your passphrase again.

    It will then state that it needs to a lot of bytes. This is what it looks after all the bits are done.
    Code:
    We need to generate a lot of random bytes. It is a good idea to perform
    some other action (type on the keyboard, move the mouse, utilize the
    disks) during the prime generation; this gives the random number
    generator a better chance to gain enough entropy.
    +++++.++++++++++.+++++++++++++++.+++++.+++++++++++++++++++++++++++++++++++.+++++++++++++++..++++++++++++++++++++.++++++++++..+++++++++++++++>+++++.+++++>+++++............<+++++....+++++
    We need to generate a lot of random bytes. It is a good idea to perform
    some other action (type on the keyboard, move the mouse, utilize the
    disks) during the prime generation; this gives the random number
    generator a better chance to gain enough entropy.
    ..+++++++++++++++.+++++++++++++++...++++++++++++++++++++++++++++++.......+++++...+++++.+++++.+++++.++++++++++++++++++++....++++++++++.++++++++++++++++++++.++++++++++..+++++..+++++...++++++++++.+++++>+++++.+++++..++++++++++..+++++++++++++++.+++++.+++++.+++++>+++++>.+++++>+++++......>..+++++<+++++..........................................>+++++<+++++....>+++++......................................................................................................>+++++<..+++++..........<......+++++.....+++++^^^^
    It will give you the key ID and say it has been marked ultimately trusted
    Code:
    gpg: key F863DEC9 marked as ultimately trusted
    public and secret key created and signed.
    It will then give you some information.
    Code:
    gpg: checking the trustdb
    gpg: 3 marginal(s) needed, 1 complete(s) needed, PGP trust model
    gpg: depth: 0  valid:   3  signed:   3  trust: 0-, 0q, 0n, 0m, 0f, 3u
    gpg: depth: 1  valid:   3  signed:   5  trust: 1-, 0q, 0n, 2m, 0f, 0u
    gpg: next trustdb check due at 2009-10-20
    pub   1024D/F863DEC9 2009-05-10
          Key fingerprint = 81A9 A67D 0BB7 3463 D20F  A1F2 C581 F033 F863 DEC9
    uid                  Michael Brown - Test (PGP Command Line Test) <michaelbrown2009@gmail.com>
    sub   4096g/3791A346 2009-05-10
    That is how you create a key via the command line.

    Creating Revocation Key/Certificate
    You should create a revocation Key or Certificate. This is a good idea because this will/can be use to revoke your public key in case your public key gets compromised.

    The command that you need to run is the following
    Code:
    gpg --output revoke.asc --gen-revoke <KEY-ID>
    It will ask you to create a revocaetion certificate for the key that you choose.
    Code:
    Create a revocation certificate for this key? (y/N)
    It will ask you to specify a reason
    Code:
    Please select the reason for the revocation:
      0 = No reason specified
      1 = Key has been compromised
      2 = Key is superseded
      3 = Key is no longer used
      Q = Cancel
    (Probably you want to select 1 here)
    Your decision?
    It will then ask you to add a description
    Code:
    Enter an optional description; end it with an empty line:
    It will then ask you to confirm what you have entered
    Code:
    Reason for revocation: No reason specified
    in case my private key becomes compromised
    Is this okay? (y/N)
    It will then ask you to enter the passphrase that you used for that key to unlock the private key
    Code:
    You need a passphrase to unlock the secret key for
    user: "Michael Brown <bromic94@pct.edu>"
    1024-bit DSA key, ID 120867BB, created 2009-03-22
    After you enter it it will state the following:
    Code:
    You need a passphrase to unlock the secret key for
    user: "Michael Brown <bromic94@pct.edu>"
    1024-bit DSA key, ID 120867BB, created 2009-03-22
    You have created your revocation certificate

    To use you revocation certification use the following command
    Code:
    gpg --export -a D8FC66D2 > mykey.asc
    Where D8FC66D2 is the Key ID

    If you want to use your revocation certificate you need to import your revocation cert and public key in your keyring. The revocation cert will be merged with your public key. You then have to upload your key to the keyservers again. It then will be revoked.

    Keep your revocation certificate in a secure location. I carry mine on a USB drive that is under lock and key.

    Command Line Key Server Syncing
    To upload your public key to the Ubuntu Key server run the following command
    Code:
    gpg --send-keys --keyserver keyserver.ubuntu.com <KEY-ID>
    Where <KEY-ID> is your key Id.

    FAQ
    What does uploading my key to the keyserver allow me to do?
    Uploading your key to a keyserver allows you to communicate with others via a signed or encrypted state. Someone can search for you. If you know you will be communicating with them make sure to give them the fingerprint of the key. This will make sure they get the right one. Years ago I had some issues with PGP key thus I have several out there and I have 1 out there for this tutorial.

    Is there another way via a web interface that I can upload my key to the Ubuntu Key server?
    You can go to http://keyserver.ubuntu.com:11371/ and scroll down to the Submit a Key section. You will have to get the "ASCII-armored version" of your public key. You can export your public key to your computer, open it, copy the contents and then paste it in the text box on that page.

    If there are any questions please let me know and I will add them.
    Last edited by daboroe; May 10th, 2009 at 03:54 PM.

  9. #9
    Join Date
    Jul 2008
    Location
    Banville :(
    Beans
    119

    Re: Part 8: Command Line generating Key

    Quote Originally Posted by daboroe View Post
    Would you guys like a tutorial that shows how to generate a key and upload it to a keyserver via the command line?

    Thanks

    M. Brown
    Yes, I would.

    Also, I was wondering about how the keyservers work regarding private and public keys. I understand that private keys are for decrypting and public ones for encrypting. Does synching allow the option to send your private key the keyserver? I imagine this is a big security risk, so I guess not. In that case are there any other ways of transferring a private key to another computer?

    Otherwise, thanks a lot. A well-written, helpful howto. The pictures make a big difference.
    Last edited by monsterstack; May 10th, 2009 at 07:59 AM.

  10. #10
    Join Date
    Apr 2007
    Location
    Pennsylvania
    Beans
    107
    Distro
    Ubuntu 9.04 Jaunty Jackalope

    Re: Creating and Utilzing a PGP Key

    monsterstack: I will do that here after I get awake a little more. lol. I will post when I have that. I will also add in the same section a little q/a area or I guess more like a FAQ

    Thanks

    M. Brown
    Last edited by daboroe; May 10th, 2009 at 03:57 PM.

Page 1 of 3 123 LastLast

Bookmarks

Posting Permissions

  • You may not post new threads
  • You may not post replies
  • You may not post attachments
  • You may not edit your posts
  •